

How To Add Garden Faucet To Sprinkler Main Line
Last week we discussed the different types of pipe used commonly used in sprinkler systems. We discussed how to lay out the pipes for your system and how to dig the trenches. Finally we discussed timers and their placement. This week we're going to go further in the process by connecting to the municipal water source, installing any necessary backflow prevention and putting pipes in the ground.
Connect Water to Main
Where your water comes from will determine how you connect into it. For most people, the water source is a municipal water line buried in the ground. If you connect through a well (which requires a pump) then the hookup to the main line is the same, however we won't be discussing installation of the pump this week. Either way, the irrigation mainline will take water from the source to the valves.
Main-lines come in many materials and sizes, just as we learned about the irrigation piping from last week. There is PVC, Polyethylene (Poly for short), Galvanized metal pipe, or Copper metal pipe.
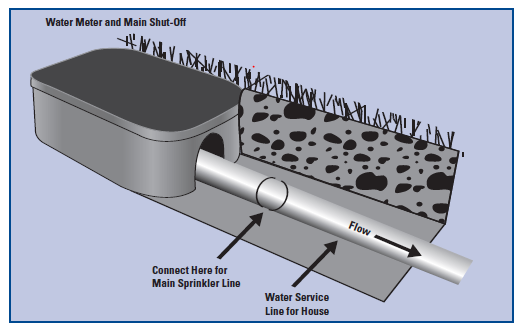
Now that we know what and where our water connection is, the first step is to dig to expose the water service line, or to expose the existing tap, faucet, etc. Once you shut off the main water supply (which is probably near your meter), open a faucet to release any existing pressure, to avoid accidents.
To install a Slip Compression Tee follow these four steps:
- Clean off the water service pipe
-
Cut out a section of the pipe-half the length of the tee
-
Install nuts and washers on each side of the pipe
-
Insert the slip tee and tighten the nuts with a wrench.
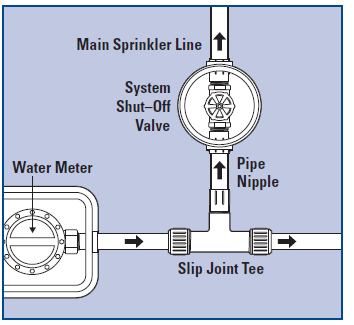
Next, we connect pipe running to the valve box, is to install a shutoff valve. You should still have your main-line shut off valve coming off the water service line that will then go into your house, but, don't forget to have one as well for the irrigation mainline. To properly install a shut-off valve follow these steps:
-
Use fittings to install a Gate or Ball valve on the tee
-
Turn on water to flush the line of debris
-
Cover with an Orbit valve box
In the above example, notice how the water line runs from the meter into the house (in black) and we break off of that for the sprinkler main line (in red). Just after branching off we recommend installing the Gate or Ball valve. This lets us easily shut off water to the sprinklers without also shutting off water to the house.
Backflow Prevention
Local codes may require you to install backflow or anti-siphon prevention. Even if they aren't required, we suggest installing one or the other.
The valve featured to the right is a 1 In. Double Check Valve Assembly. This valve prevents harmful contaminants from siphoning back into the water supply. It also functions as a main shut-off valve.

The photo to the right features another type of backflow prevention device called an anti-siphon valve. The valves should be positioned such that water drains away from the house. These particular valves need to be installed a minimum of six inches above the highest sprinkler head. There must be no back pressure on the valve, and no valve on the downstream side of the anti-siphon. As you can tell, these devices are very important to have on your line to keep the water safe. Check with local code/authorities what type of device is required, how it needs to be installed, and who is authorized to install it.
Connecting Manifolds
In our previous blogs we covered placement of the valve box. It is now time to discuss how to install the valve box. Dig down 8 to 14 inches, depending on the box, and place about two inches of crushed gravel. This will allow excess water and condensation to drain without sinking the surrounding area. Next, place Orbit's valve box base on the gravel. Watch this short movie on the benefits of using Orbit Valve Box Base.
Before connecting the manifold to the mainline, open the main shut-off valve to flush dirt from the main sprinkler line. Next, install your manifold. The easiest way to install a manifold is with an Orbit Pre-Assembled manifold. These manifolds install in minutes, works with Poly-Pipe and PVC systems, and expandable for future sprinkler systems. Watch this short movie to learn more about Orbit's Pre-Assembled Sprinkler Valve Manifold.
Last week we also talked about the wiring necessary for the timers. It's a good idea to make these connections now. Follow the instructions for connection.
Working with Pipe
The different types of pipe have been discussed previously. Upon choosing your pipe type, remember that each has different assembly requirements.
PVC is harder to work with, as it doesn't have much give to it and isn't flexible, but it is stronger. Fittings can be tricky though. It's need two compounds (primer and cement). First, apply the primer, which works to slightly 'melt' the pipe and fitting, making just enough room for them to slip together. The cement then forms a permanent, watertight seal.
If you decide to use traditional fittings, remember to follow the instructions precisely as stated, allowing the cement to dry completely (usually 1-2 hours) before running any water through pipes. Failure to do so may cause incorrect setting of the glue, leaving leaks for water to escape or debris to enter. Once the pipe and fitting are joined they cannot be separated or moved, so make sure to set them correctly within the first 10-20 seconds of joining. If a mistake is made the fitting must be cut from the pipe (and discarded, it is now useless) and a new fitting joined. The pipe can be reused assuming it is long enough.
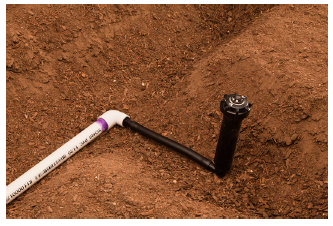
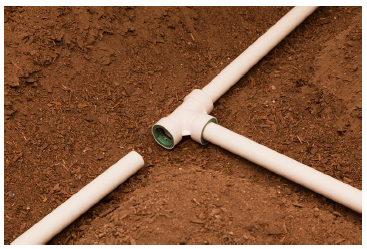
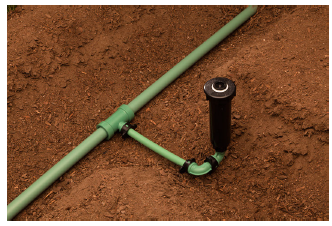
In this picture the PVC fitting is attached using the primer and cement to seal the fitting onto the pipe. As is common, a poly riser is attached at the sprinkler head.
PVC with PVC-Lock™ fittings
Poly Pipe
As depicted PVC pipe is inserted into the PVC-Lock™ fitting easily for a secure watertight seal.
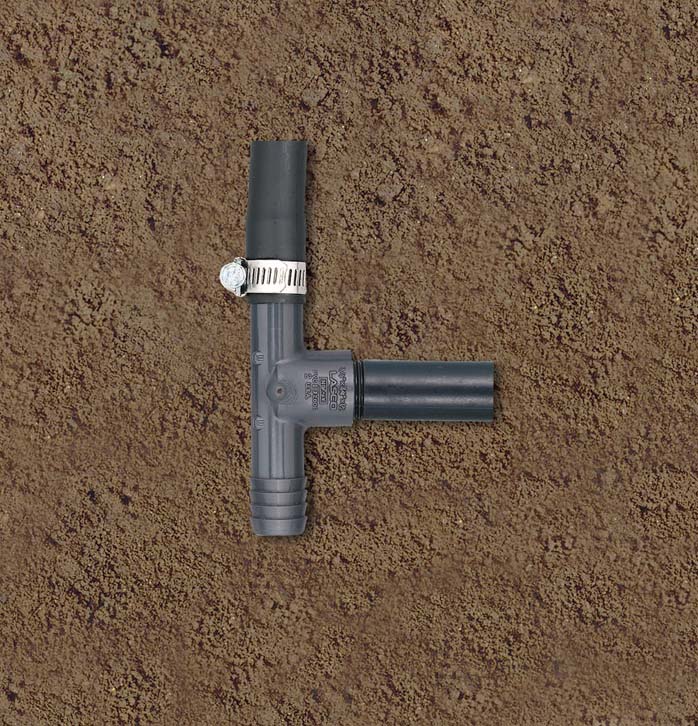
Poly pipe can be equally frustrating as correct installation requires the use of screw-clamps to secure all fittings. These steel clamps hold the fitting tightly, allowing great amounts of pressure to easily through. It is recommended to not use Poly pipe for the main line to the manifold. There is some advantages though, as Poly is usually less expensive and it's flexibility means less fittings.
Eco-Lock®
Similar to Poly pipe, yet functional with poly and PVC fittings, Eco-Lock® is the best of both worlds. Using the Eco-Lock® fittings (similar to the PVC-Lock™ fittings) you simply push and turn to have an instant seal proof connection. Eco-Lock® fittings can swivel on the pipe to provide 360-degree directional adjustment as well. The ability to use these fittings to retrofit any system with existing PVC or Poly fittings is a must have.
With all these pipes you'll need some tools. A pipe cutter, measuring tape.
Join us next week as we will detail how to install the mainline, install manifolds, and connect zones.
How To Add Garden Faucet To Sprinkler Main Line
Source: https://www.orbitonline.com/679-2/
Posted by: smithbanke1953.blogspot.com
0 Response to "How To Add Garden Faucet To Sprinkler Main Line"
Post a Comment